Monday, June 18, 2012

Fandango Diaper Bag

I have recently come to the realization that baby-time is quickly approaching and I needed to get my butt in gear (ok, so really it was Hubby telling me that I can't start any other projects until I finish all the baby stuff that really got me going...), so I whipped up the diaper bag as my first baby project. When I decided that I would make my own diaper bag, I started searching for patterns and found quite a few free ones, but was drawn in by Anna Maria Horner's book Handmade Beginnings: 24 Sewing Projects to Welcome Home Baby, which featured a diaper bag (or as it's called in the book "Here We Go Bag") and settled on that one.  The main exterior print and the interior print are both Kate Spain's Fandango, and the pink handles and pockets is Feedsack II by Sara Morgan.

Diaper Bag Exterior 

I must say, I really do like the look of it, but I wasn't a huge fan of the pattern or the construction of the bag.  Firstly, the pattern pieces for all of the projects were drawn over lapping each other, so I had to find some tracing paper and trace out the pieces for just this project...this became a huge pain in the butt, because the only paper I had was 8"x11" foundation paper, and of course all the pieces were bigger than the paper would fit, so I had to tape some pieces together which was not ideal (I do blame myself for that one since I was too impatient to wait until I could get to the store and get proper paper before starting).  I know this type of pattern is probably normal, but I think I've been spoiled using mostly Amy Butler patterns which each come with their own page so you can actually cut them out...oh well, moving on.  I also was not a fan of all the extra firm stabilizer, I think I would have preferred to use fleece instead to give it a little more "give" and versatility when it comes to being able to pack stuff in it, but I'm not sure how the over all look would have been without it being so structured.  I also learned that when directions call for double sided fusible interfacing, don't cheap out and buy the sew in with plans to just use fabric glue to attach it...turns out that's a really bad plan, and I should have saved myself a lot of frustration and forked out the extra $6 or so for the right stuff...

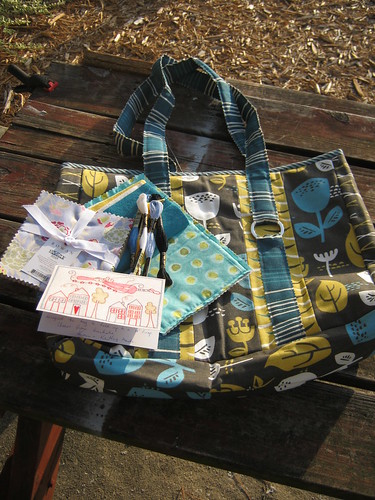
Anyway, the directions called for just the interior divider, with an option of adding pockets however you'd like.  I tried to add as many as I could with the fabric I had left over.  Having never had to have a diaper bag before, I really didn't know what kind of pockets I "need", so I tried to make a small variety, hopefully it works out.  I also added little rings on the inside to clip my keys to, and added the long, removable strap to the exterior so it can be worn across the body if I so choose.  

Diaper Bag Interior 

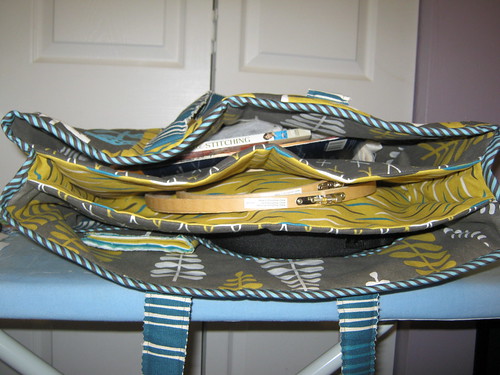
Turns out it's really hard to get a picture of the inside of a bag, but you can kind of see some of the pockets here.  

Diaper Bag

Here it is loaded with a few items to test it out a bit...so far so good, but only time will tell! It is REALLY big, so it should be a pretty good bag for those times that I need to bring everything with me, and it will be great to be able to have room for my stuff as well as baby's without having to carry a separate purse.  

I am entering this bag into Purse Palooza over at Sew Sweetness.  There are already so many great entries in the Flickr pool, so if you need any inspiration for any bags or purses for yourself, you should definitely check it out!! 

Saturday, June 16, 2012

Zig-Zag Pouch Tutorial


When I decided to make a zig-zag pouch for my Modern She Made Swap partner, I searched the inter-webs for how to make zig-zags…I kept coming up with various tutorials that used HSTs or odd triangle stacking shenanigans that I just wasn’t down with for making just a little pouch, and I thought there MUST be a simpler way, so I put my brain to work and reached back to middle school geometry to come up with another way that made more sense to me.  Please note that in no way am I claiming to be the inventor of this method, in fact I’m pretty sure I saw something similar out there recently, but I did find this way easier than all that triangle cutting madness and wanted to put together a tutorial using what worked well for me.  Bare with me as this is my first tutorial so it may be a little rough…please leave me a comment if anything needs to be clarified or if you have any feedback on how I can improve for future tutorials! Hope you enjoy!  J

Zig Zag Pouch Tutorial
**Disclaimer: Please feel free to use my tutorial as much as you'd like for personal use, but please do not use for commercial purposes. If you use my photos or share this in any way, please credit back to me, it's just the polite thing to do!  J **

Materials needed to make an approximately 8” x 6” pouch:
*2 fat quarters for the exterior (you will not use nearly a full fat quarter, you just need enough to get 12 rectangles measuring 2”x6” in each fabric, plus a strip for the wrist strap and scraps for the zipper tabs)
*2- 8” by 6” rectangles for the interior
*8” zipper
*Marking tool
*3” wide 30-45-90 ruler
*Rotary Cutter and mat
*Turning tool
*Hand sewing needle and thread (optional)

  1. Start with 3- 2” wide by 18” long strips of each exterior fabric to trim down into your smaller pieces. 
  2. Cut the strips down so you get 12- 2”x6” pieces of each exterior fabric 
  3. Get two of each of your exterior fabric strips together for your first panel and measure in from the left edge of each of the strips 1.5” and make a small mark 
  4. You will need the strips to be staggered by this 1.5” like this…
  5. Place two strips (one of each fabric) right sides together, matching the long edges and starting the short edge along the mark you made, sew together with ¼” seam allowance 
  6. Sew the other two strips in the same way, then sew these two sets together (make sure to alternate colors). Press your seams open. You should now have something like this 
  7. Using a 3” wide, 30-45-90 ruler, line the 45 degree mark up with the top raw edge and use your rotary cutter to trim the right edge, be sure the width of the ruler fits completely on the fabric on both sides before you cut                                                                                                                             
  8. Now turn it around 180 degrees and again line the 45 degree mark up with the top raw edge and trim the other edge                                                                                                                                      
  9. Your piece should now look like this                                                                                                    
  10. Line the piece up with the vertical lines on your cutting mat, and square off the top and bottom edges so you have a nice rectangle     
  11. Repeat steps to make two more matching rectangles, then repeat the steps again to make 3 more in the opposite direction.  (When measuring in 1.5” to stagger the pieces, measure from the RIGHT instead of the left and stagger in the opposite direction from the first 3 you made as demonstrated below)                                   
  12. You now have 6 rectangles…3 for the front and 3 for the back (sorry, picture only shows 3 of them) 
  13. Take the three rectangles for the front and sew the first two together, making sure to match up the seams and also making sure you’ve got two with angles going in opposite directions.  Now add the third rectangle, again making sure your angles are going in opposite directions and that your seams are matched up. Press seams open and square it up 
  14. Repeat steps so you have a second panel.  Notice in the picture below that in the top one, the angle starts down and in the bottom one the angle starts up…this is so that when you sew the pouch together the zig-zag will continue all the way around
  15. Cut two small pieces for your zipper tabs…you want them at least as wide as the zipper, and about 3 inches long.  Fold them in half with wrong sides facing, matching up the small ends and press.  Place them on the end of the zipper strip so that the folded end goes past the zipper stop, when the pouch is finished you want about a half of an inch or so showing, depending on your preference. Make sure the zipper pull is out of the way and sew across the tab, close to the folded edge
  16. Now line up the edge of the zipper with the top raw edge of the exterior panel with the top side of the zipper facing the right side of the panel, pin in place. 
  17. Line up the edge of the interior panel with the edge of the exterior panel and zipper, now making kind of a “zipper sandwich”, so that the right side of the interior and exterior panels are facing, pin in place (you can remove the other pins now that the whole sandwich is pinned in place) 
  18. Make sure the zipper pull is at least half way open, and using your zipper foot sew close to the teeth of the zipper. When you get to the zipper pull, stop your machine with the needle in the down position, lift your presser foot and carefully pull the zipper back towards the end you’ve already sewn. Continue sewing to the end.  Repeat to attach the other two panels to the other side of the zipper and press the seams. You can top stitch along the edge if you’d like to finish it off nicely (this will also help to keep fabric out of the zipper)                                                                                                          
  19. If you want to have a wrist strap, take a strip of fabric, about an inch wide (or more if you want the strap wider) and twice the length you want your strap to be. Fold in half matching the long edges and press, stitch down the edge and turn the tube right side out (this can be tricky with such a skinny tube…I find using a crochet needle helps along with some tweezers to help pull it through). Press the tube flat and top stitch along the edges                                                                                                 
  20. Now it is time to turn this into a pouch…make sure you leave the zipper open all the way, open up the panels so that the right sides of the interior panels are facing and the right sides of the exterior panels are facing, lining up all of the edges (make sure to try to match the seams for the zig-zags!), pin in place.  For the wrist strap, fold in half, place in between the two exterior panel about an inch or so down from the zipper (or in whatever placement you prefer), and line up the raw edges of the strap with the raw edges of the panels, pin in place                                                                                       
  21. The zipper tabs should be folded toward the exterior panels as I tried to show in this picture. It may help to press it down a bit                                                                                                                   
  22. Sew along the edges all the way around, but leave a few inches open at the bottom of the interior panels. Make sure to back stitch at each end of the opening. Trim the corners and the zipper ends to reduce bulk but be careful not to cut your stitches.  Turn it right side out using the opening you left in the bottom.  Use a turning tool to turn out all the corners.  Fold the edges of the opening in about a quarter inch and press, sew the opening shut by either hand stitching with a slip stitch, or machine stitching close to the edge. (yes, this picture is missing the strap…I actually went back and added it later because I forgot the first time…but, your strap should be on the outside now…) 
  23. Now you can push the lining into the pouch and marvel at your handiwork! 

Have fun playing with the design of this pouch…you can quilt the exterior, make the zig-zags skinnier, make it scrappy, the possibilities are endless! If you do make something with this tutorial, I’d love to see it, so feel free to email me a photo of it J

Thursday, June 14, 2012

The Lone Starburst Pouch

Now that Rebecca has (finally) received the pouch I made for her for our mini-swap, I (finally) get to share it! This was obviously a very long time in the making...I actually started with this... 

Star 

...a Fancy Folded Star.  I love how it was turning out, but it was just too bulky to make into a pouch.  I had to come up with a new plan so I searched for something with a similar textured kind of look...enter The Lone Starburst! I found the tutorial at Six White Horses for this block.  I felt like it still had the same feel to it as the folded star, but much more appropriate to use in a pouch.  I wound up shrinking the pattern by 50% which made the paper piecing quite tricky, but it was fun to put together.  Luckily we had a little sun this weekend so I was able to sneak in some decent pictures.


I finished it off with some hand stitching around the star, I think it gives it a nice textured look. 


Check out my zipper tabs! Not perfect, but getting better...I still can't quite get them totally squared off.  Any suggestions? 


Finishing the back is something that I floundered on for a while and is probably why it took me so long to finish...I didn't want to overwhelm the pouch with another patchwork something-or-other on the back, but I didn't want it to be plain either, so I did some more hand stitching in an angled pattern to give just a little bit of interest. 


I finished the whole thing off with a matching key fob...I have recently become obsessed with these and want to make them with any excuse I can find so of course she had to have one...

I had a lot of fun making this, I was pretty nervous at first to try to come up with something that Rebecca would appreciate (and to make it good since she is so talented!), and in the end I really like how this turned out.  It was definitely out of my comfort zone a little bit what with all the hand stitching, but I think I'm improving! Maybe soon I will break away from just the straight quilting lines and try some other embroidery ;-)

I am linking up with Katie at There and Back for The Handmade Parade this week.  Always a good place to go see what some other people are up to for some hand stitching inspiration!!

There and Back


Tuesday, June 12, 2012

Happy as a hipster llama...

I just completed my first swaps, and couldn't be more happy with what I got in return! Firstly, I had my mini swap with Rebecca...She made me a mini-quilt, and holy cow llama did she out-do herself!! When she first posted that she had gotten this llama fabric, I told her how much I LOVED it and she decided to incorporate it into my mini, and she did such an awesome job. I am in awe of not only her sewing skills, but her design skills as well! (Prepare for picture overload, because I am that much in love with this mini)

Amazing mini!

I've decided to name him Ferdinand...I had a few names in mind and this one was recommended by Rebecca as well, after sitting with him for a little while, I definitely think it fits. 

Ferdinand in his new home

Um...so I apologize for the terribly out of focus picture...but here's Ferdinand in his new home

Ferdinand the llama Llama hats!  

Hipster Ferdinand and his hipster hats....

Love the quilting...

The backing is very pretty also, I love the design the quilting made on the back.  

Fun Fabrics

To top off this already awesome package, she also sent me some pretty fabric to make something for my soon-to-be-born baby girl, how sweet was that?  Can't wait to come up with something for her :-) If you want to read about her design process, check out her blog about it here

I also received my gift from the Modern She Made Swap, my first "official" swap.  I received this amazing bag from Karen at Sew Well Maide, how lucky am I?! She totally nailed my tastes and did such a great job on the bag. It seriously looks so professionally made, and she designed the pattern herself!! I had expressed that I wanted a tote bag to carry my embroidery stuff, and this bag totally fits the bill.

MSMS

I LOVE the fabric choices she made for this, totally me!! 

MSMS Gift

And check out all these great extras she threw in...a cute little matching needle book, some embroidery thread and an Amy Butler charm pack...can I just tell you how I've always wanted to get my hands on some Amy Butler fabric because I think it's so pretty, but have never been able to bring myself to do it?  It's like she read my mind!

MSMS Gift

Here it is already loaded with some stuff...check out all the room in there! That's a 12 inch hoop and it looks small in there compared to how roomy the bag is.  There are lots of great pockets and dividers also, it's very well thought out.  

Once Rebecca has received her pouch I will share that (I'm a slacker and got it out a little late...), I had my doubts in the process of making it, but really like how it turned out.

Now, a question for all you wise quilty-types....do you pre-wash pre-cuts like you would normal yardage?? I have this charm pack now, and also a jelly roll I bought a while back, and I'm afraid to wash them and ruin them! So any advice would be much appreciated :-)

Sunday, June 3, 2012

Christmas In July Event!

It's time to break out your holiday fabrics, Christmas Carol CDs and (iced) hot cocoa guys...Rebecca at Sew Festive Handmade is holding a really fun event this summer called Christmas In July, and she's asked me to be one of her guest bloggers! Every Monday through the month of July, she will have two holiday tutorials, one being home decor, and the other will be a gift idea. At the end, she will have a linky party where everyone can link up to show what they've come up with in early preparation for the holidays! The best part is there will be prizes at the end! Who doesn't love prizes?? I am so excited for this, hopefully it will inspire me to actually start some holiday sewing early, unlike last year where I waited until the last minute and hardly got anything I wanted to do finished.  Click on over to her blog to read more about it and check back soon to see the great schedule she's got lined up. 

Photobucket