

Happy Thanksgiving everyone!! I am pleased to announce that I got my Turkey wall hanging quilt finished just in time to hang for the holiday AND to enter it with the final month of Celebrate Color! So without further ado…
Introducing Thomas A. Turkey!
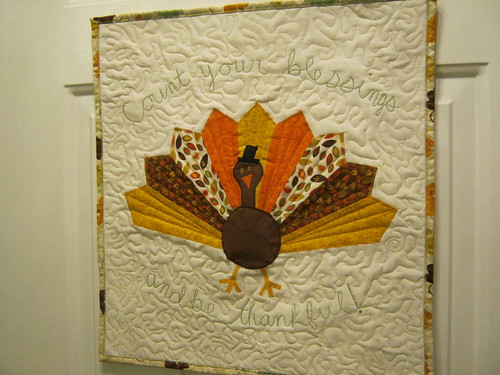
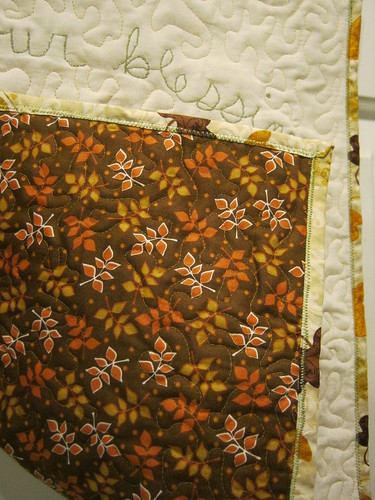
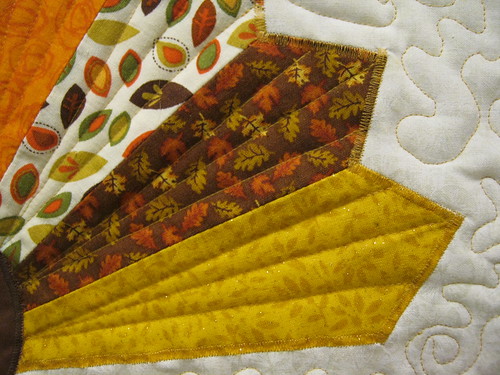
I had the idea a few months ago to make a turkey using the Dresden plate, I didn’t think I’d ever seen it before but I Googled it and apparently it’s all over the place! I probably saw it at some time and just kept it in my subconscious...oh well. Anyway, I watched this video by Missouri Quilt Company to kind of give me an idea of what they did, and then I just went with it. I knew I wanted to make the turkey but had no idea where it was going to take me, the whole thing just kind of came together as I went! The turkey itself was made with a fat quarter bundle I got at the fabric store for the feathers along with some solid color scraps I had in my stash for the body. I appliquéd the whole thing onto the main exterior fabric and then put on the embroidery. After that, I put the quilt sandwich together using some nice fall-inspired backing and the binding was made with one of the fat quarters that I didn’t use for the feathers.

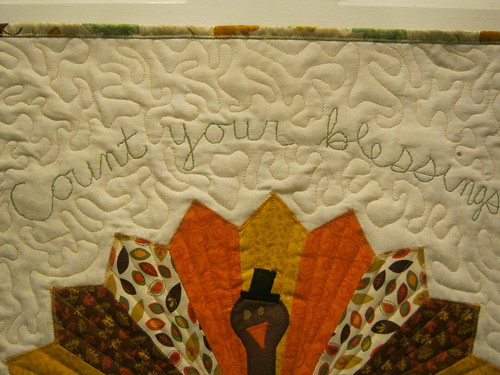
I am so pleased at how well this came out, and surprised, to tell you the truth! I tried a couple things on this that I have never done before, so there were plenty of things that could have gone wrong, but all-in-all it went pretty smoothly. One thing I’m especially proud of is the embroidery. I have wanted to try this for a while and decided this would be a great project to use it on. When I asked a woman at the local quilt shop what kind of thread to get, she recommended I try Sulky brand thread, so I picked up some shimmery green in 40 wt, then I practiced on some scraps with a couple of methods that I saw mentioned here and there on the web. The method I found to be the easiest was using my FMQ foot with presser feet down, guiding it through as if the needle was a pen, using a straight stitch. After I did my first word on the actual quilt, though, that just didn’t stand out enough for me. I decided to try using a really small zig-zaq stitch, keeping the stitches as close together as I could. This was really tricky, and I had to be VERY patient moving it through to make sure my lines were smooth, but I love the effect it had. One thing I would do differently next time though is the actual tracing of the letters onto the fabric. I used a soluble pen and hand wrote the words on there, but I think next time I will print the words out on some kind of transfer paper. I think that way would make it a little more evenly spaced and sized. Also…some spots where I wrote with the pen keep showing back up! Grr….
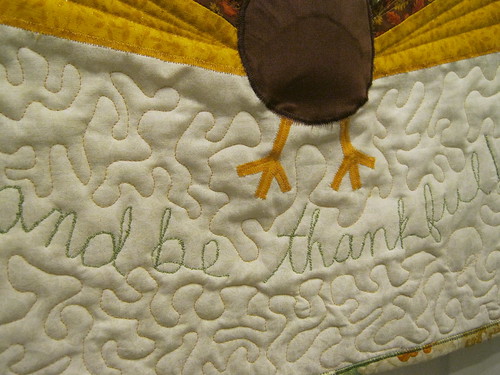

Another new thing I tried was the free motion quilting. It was so much fun to do, and after a few trials on some scrap I jumped right in. The thread I used was a nice thin gold (I think 60 wt?) that somehow I wound up with about 1500 yards of during a different project and it was just begging to be used up. I’m not sure how or why I had such a big of a spool of this, but it was nice because I didn’t have to worry about running out in the middle of it all and the color was perfect for this project. I did have it break on me a few times which was frustrating, but I made it through and I think it looks pretty snazzy! I almost didn't add the quilting lines in the feathers, but I decided to after quilting the rest of it. I'm glad I did, I think it added some structure and finished it off nicely!
For the binding, I used the Zig-Zag binding tutorial at Stitched in Color again. It turned out great, though I do need some practice doing the corners and where the binding connects. I tried multiple times to connect it with the 45 angle like in the tutorial, but just couldn’t quite figure it out. I was running out of time so I wound up just placing one end over the other and stitching it like that. Oh well, it still looks nice I think.

Other than the few little things here and there, there is not a whole lot on this I would re-do if given the chance. I love how it all came together and I’m sad that it’s so late in the season that I won’t be able to enjoy it hanging up for very long! I think I’ll try to leave it up as long as I can before hubby notices ;-)

Thanks for stopping by everyone, I hope you all have a wonderful Thanksgiving, and remember the message from Thomas A. Turkey, “Count your blessings and be thankful!” I know I have been very blessed this year and am glad to be able to share this time with my family!
I don't think I could be more excited for a post from you! What a terrific project that you should be SO proud of! This turkey is charming and fun. I really LOVE the top hat! The free motion quilting is well done and on your FIRST TIME! Holy moly girl you are good! This is such a happy wall hanging for Thanksgiving and something you will put up every year. I love the backing fabric too. This is adorable!!! Happy Thanksgiving to you and your family!
ReplyDelete