
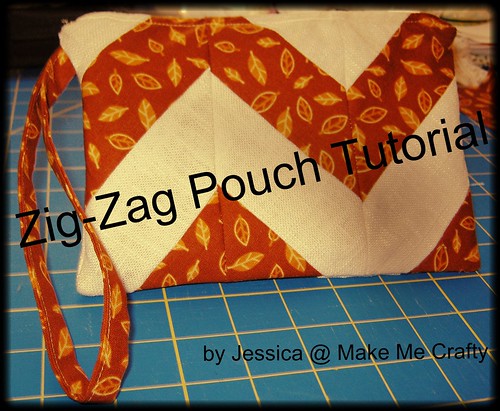
When I decided to make a zig-zag pouch for my Modern She
Made Swap partner, I searched the inter-webs for how to make zig-zags…I kept
coming up with various tutorials that used HSTs or odd triangle stacking
shenanigans that I just wasn’t down with for making just a little pouch, and I
thought there MUST be a simpler way, so I put my brain to work and reached back
to middle school geometry to come up with another way that made more sense to
me. Please note that in no way am I
claiming to be the inventor of this method, in fact I’m pretty sure I saw
something similar out there recently, but I did find this way easier than all
that triangle cutting madness and wanted to put together a tutorial using what
worked well for me. Bare with me as this
is my first tutorial so it may be a little rough…please leave me a comment if
anything needs to be clarified or if you have any feedback on how I can improve
for future tutorials! Hope you enjoy!
J
*2 fat quarters for the exterior (you will not use nearly a
full fat quarter, you just need enough to get 12 rectangles measuring 2”x6” in
each fabric, plus a strip for the wrist strap and scraps for the zipper tabs)
*2- 8” by 6” rectangles for the interior
*8” zipper
*Marking tool
*3” wide 30-45-90 ruler
*Rotary Cutter and mat
*Turning tool
*Hand sewing needle and thread (optional)
- Start with 3- 2” wide by
18” long strips of each exterior fabric to trim down into your smaller
pieces.

- Cut the strips down so you
get 12- 2”x6” pieces of each exterior fabric

- Get two of each of your
exterior fabric strips together for your first panel and measure in from
the left edge of each of the strips 1.5” and make a small mark

- You will need the strips
to be staggered by this 1.5” like this…

- Place two strips (one of
each fabric) right sides together, matching the long edges and starting
the short edge along the mark you made, sew together with ¼” seam
allowance

- Sew the other two strips
in the same way, then sew these two sets together (make sure to alternate
colors). Press your seams open. You should now have something like this

- Using a 3” wide, 30-45-90
ruler, line the 45 degree mark up with the top raw edge and use your
rotary cutter to trim the right edge, be sure the width of the ruler fits
completely on the fabric on both sides before you cut

- Now turn it around 180
degrees and again line the 45 degree mark up with the top raw edge and
trim the other edge

- Your piece should now look
like this

- Line the piece up with the
vertical lines on your cutting mat, and square off the top and bottom
edges so you have a nice rectangle


- Repeat steps to make two
more matching rectangles, then repeat the steps again to make 3 more in
the opposite direction. (When
measuring in 1.5” to stagger the pieces, measure from the RIGHT instead of
the left and stagger in the opposite direction from the first 3 you made
as demonstrated below)

- You now have 6
rectangles…3 for the front and 3 for the back (sorry, picture only shows 3
of them)

- Take the three rectangles
for the front and sew the first two together, making sure to match up the
seams and also making sure you’ve got two with angles going in opposite
directions. Now add the third
rectangle, again making sure your angles are going in opposite directions
and that your seams are matched up. Press seams open and
square it up


- Repeat steps so you have a
second panel. Notice in the picture
below that in the top one, the angle starts down and in the bottom one the
angle starts up…this is so that when you sew the pouch together the zig-zag
will continue all the way around

- Cut two small pieces for
your zipper tabs…you want them at least as wide as the zipper, and about 3
inches long. Fold them in half with
wrong sides facing, matching up the small ends and press. Place them on the end of the zipper
strip so that the folded end goes past the zipper stop, when the pouch is
finished you want about a half of an inch or so showing, depending on your
preference. Make sure the zipper pull is out of the way and sew across the
tab, close to the folded edge

- Now line up the edge of
the zipper with the top raw edge of the exterior panel with the top side
of the zipper facing the right side of the panel, pin in place.

- Line up the edge of the
interior panel with the edge of the exterior panel and zipper, now making kind
of a “zipper sandwich”, so that the right side of the interior and
exterior panels are facing, pin in place (you can remove the other pins
now that the whole sandwich is pinned in place)

- Make sure the zipper pull
is at least half way open, and using your zipper foot sew close to the
teeth of the zipper. When you get to the zipper pull, stop your machine
with the needle in the down position, lift your presser foot and carefully
pull the zipper back towards the end you’ve already sewn. Continue sewing
to the end. Repeat to attach the
other two panels to the other side of the zipper and press the seams. You
can top stitch along the edge if you’d like to finish it off nicely (this
will also help to keep fabric out of the zipper)

- If you want to have a
wrist strap, take a strip of fabric, about an inch wide (or more if you
want the strap wider) and twice the length you want your strap to be. Fold
in half matching the long edges and press, stitch down the edge and turn
the tube right side out (this can be tricky with such a skinny tube…I find
using a crochet needle helps along with some tweezers to help pull it
through). Press the tube flat and top stitch along the edges

- Now it is time to turn
this into a pouch…make sure you leave the zipper open all the way, open up
the panels so that the right sides of the interior panels are facing and
the right sides of the exterior panels are facing, lining up all of the
edges (make sure to try to match the seams for the zig-zags!), pin in
place. For the wrist strap, fold in
half, place in between the two exterior panel about an inch or so down
from the zipper (or in whatever placement you prefer), and line up the raw
edges of the strap with the raw edges of the panels, pin in place

- The zipper tabs should be
folded toward the exterior panels as I tried to show in this picture. It
may help to press it down a bit

- Sew along the edges all
the way around, but leave a few inches open at the bottom of the interior
panels. Make sure to back stitch at each end of the opening. Trim the
corners and the zipper ends to reduce bulk but be careful not to cut your
stitches. Turn it right side out
using the opening you left in the bottom.
Use a turning tool to turn out all the corners. Fold the edges of the opening in about a
quarter inch and press, sew the opening shut by either hand stitching with
a slip stitch, or machine stitching close to the edge. (yes, this picture
is missing the strap…I actually went back and added it later because I
forgot the first time…but, your strap should be on the outside now…)

- Now you can push the
lining into the pouch and marvel at your handiwork!


Have fun playing with the design of this pouch…you can quilt
the exterior, make the zig-zags skinnier, make it scrappy, the possibilities
are endless! If you do make something with this tutorial, I’d love to see it,
so feel free to email me a photo of it J

No comments:
Post a Comment